
Starting any new business venture can be a real challenge, and doing it from scratch can add extra challenges. However, DIYing a shipping container farm gives you control of the layout and materials used and lets you dial into your growing needs while saving thousands in costs.
Shipping container farms haven’t been around for very long, but they have exploded in popularity at the front of the urban farming movement. Building an efficient urban farm from reused components is one of the most sustainable ways to get into agriculture. These farms also use climate control technology, meaning you can place one in any environment and produce fresh food year-round.
The main drawback of shipping container farms is the up-front costs of purchasing one. A new farm will likely cost you well over $75,000, with top of the line models selling for $149,000. These farms function well and are well developed and researched, but that price tag can scare away those wanting to get involved.
If you are handy and interested in DIYing a shipping container farm (which is probably why you clicked on this article), then you can save a lot of money by building your shipping container farm. Below I’ll go through all the steps from start to finish on creating your container farm and giving you your best chance to make a profit at the end.
Research, Research, Research
Before you even think about the construction phase, you’ll need to do plenty of research. You don’t want to go through all the work to build a container farm and realize that you can’t sell your produce, can’t grow suitable crops, or don’t know how to get a good harvest.
1. Market Research
Market research is an important place to start, as knowing what your target consumers are looking for will drive the rest of the project. Chefs might be looking for a Thai Basil, restaurants with a variety of leaf lettuce, and individual consumers in your area may be craving fresh kale. Knowing precisely what produce is missing from your local market will give you a niche to fill.
Asking local chefs what they are looking for is a great way to start, and building relationships early is key to running a successful business. In my experience, most chefs will be excited over the prospects for local produce and will pay a little more for same-day produce.
How you choose your target consumers and the product is up to you, but be sure you find a viable niche. This will depend highly on your area and what you are interested in growing. And remember, most systems are flexible enough that you aren’t stuck only able to produce one plant, but microgreens will take a different setup than hydroponic lettuce or mushrooms.
2. Local Laws
Another area that can prevent a container farm business from taking off is local laws. Some areas will require licenses and food certifications to sell produce. The other area that is often a problem is zoning laws.
Thankfully, container farms take up a reasonably small footprint and can be placed just about anywhere. Being only 8 feet wide and 40 (or 20) feet long, it doesn’t take a large lot to fit a container, and it can even fit in your backyard or an empty lot downtown.
The downside is that some commercial and residential zones’ zoning restrictions may prevent container farms or require special considerations. This depends on local laws, so please check that you can put your container farm where you want.

3. Research Growing Methods
Fully covering all the different growing methods, you can use in a shipping container would take several articles. Still, as a brief overview, you have options to choose from, including hydroponics or aquaponics for nutrient sources and methods of nutrient delivery options as film technique, deep water culture, wicking, drip irrigation, ebb and flow, or aeroponics. Or, if you’re growing other specialty crops, you may need a different setup.
If this feels like a lot, don’t worry because I’m going to give you a few broad options: easy to build, versatile, and a system that is unlikely to fail. However, use this as a guide rather than rigid rules, as your experience and needs will dictate exactly what design you should build.
For a first-time DIY setup, I recommend using either a drip irrigation system or nutrient film technique (NFT). This will work well for leafy greens, lettuce, and herbs. Going with a high turnover product is ideal for having a monthly income and the change produce quickly if needed.
Growing specialty, high nutrient crops such tomatoes, peppers, or cannabis can be done on shipping container farms, though a Deep Water Culture (DWC) system would be better suited for those plants. Mushrooms and microgreens also need a different setup than traditional hydroponics, and these can be set up for much cheaper than any other shipping container farm.
At this point I would also make sure you are familiar with pests in your area and how to recognize and deal with them. However, for easy treatment you can use an organic 3-in-1 such as Grower’s Ally Defender 3 which is an organic miticide, insecticide, and fungicide and will solve 99% of damage.

The Logistics Before Buying The Container And Components
Before you start purchasing but have a plan for what you are growing, there are a few key obstacles to figure out. Most of these you have probably thought about while in the initial research and planning stage, but they are all essential to get buttoned up before starting the project.
1. Location
As mentioned earlier, local permits may be needed due to zoning and laws. However, you’ll need a large enough level space for the container and easy access to electricity and water.
Selecting a site should be large enough for the size of the container you plan to use; for a 40′ container, I recommend a 50’x10′ plot to give you extra room on all sides and in front of the door for loading and unloading produce and materials.
At least a 230V single-phase power connection is necessary for a refrigerated shipping container, but using 3-phase power will save you money on electricity if available. Water hookups are also needed to keep the plants in a fresh water supply. Unless you have extensive experience with electrical work and plumbing, you’ll need to hire contractors to do that work, and possibly get it will need to be approved by inspectors.
Placing the system on land you own is a great way to save on possible rental fees, but this is not always possible. Especially in large cities, space can be at a premium. Checking in industrial areas and markets nearby is one way to find a low-cost rental space, and some large warehouses may rent out space for you to place your container farm.

2. Funding
Securing enough funding to begin the project is another crucial aspect to consider. Whether you are planning on writing a business plan and applying for a loan, funding it outright with savings, or building it piece by piece, you will need a plan to fund the project.
Even building a shipping container farm yourself, you should expect to spend $30,000+ on materials and labor, which is no small sum. Many producers will need help funding this project, so obtaining a loan is a popular choice. You’ll need to build a solid business plan to present, including projected market and profits.
Funding a container farm without a loan is doable, and having 100% equity will increase monthly profits significantly from the first harvest. If you plan on DIYing, I suggest funding it outright. A loan is more reasonable for pre-built options with minimal downtime between purchase and growing.
The Construction Process
Once you have figured out the who, what, where, when, and why of your business, it is finally time to start on the how and get the container farm built out and ready to produce your crops. Whether you are building a container farm as a way of year-round produce for your family or as a profitable urban farm, creating an ideal growing environment is key.
Starting any farm, no matter the size, is no small task, and building a vertical farm can be incredibly challenging. Think of this as a general guide rather than a precise how-to. I’ll cover setups using NFT and vertical ZipGrow towers, as these will give you a good idea of the two easiest vertical farming methods. I’ll also go over projected yields and costs to give you an idea of what to expect from one of these units.
Planning the physical layout will depend on your needs and preferences, but leave room for walking and accessing each growing space. Also, leave room for seedlings, a work table, and more storage than you think you’ll need.
Every operation I have helped design/run, and everyone in the industry I have asked about what one change they would make is almost always adding more storage. It is easy to underestimate how much space you’ll want for seeds, nutrients, packaging, and anything else you keep in the growing area. Plan to leave at least 50-75 square feet in the container for a workspace and storage, leaving 210-235 square feet for the system itself.
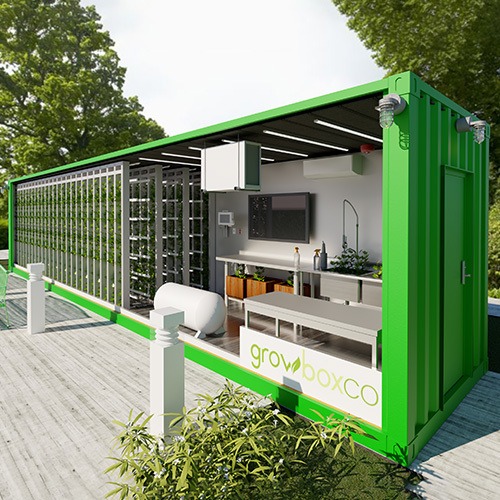
For an idea on how much space should be devoted to growing vs storage and workspace here is an example of a Grow Box, another brand of container farms. Note how only 2/3 of the container is growing their crops, and the other third is mostly open space.
Building vertically allows you to increase your growing area and can be done in layers or by planting vertically. Both options are viable and also have unique drawbacks.
The most prominent drawback of stacking layers of NFT production is that each layer requires more lighting, which can quickly add up. This will be the most significant difference in initial costs when going this route.
Lighting a larger area and getting the most out of each square foot using vertical towers is easier, but it runs the risk of causing bacterial growth and leaks.

1. The Container
The first step is selecting the shipping container you will use. Since we are using controlled environment agriculture to create an ideal growing environment, I strongly recommend using a refrigerated shipping container.
Starting with a 40’+ “Reefer” container provides many benefits and will save you time and money. The first benefit is they are already insulated, usually with an R-30 value which is fantastic at keeping cold air in or out, depending on the season. The second benefit is they are already set up with temperature controls up to 70 degrees, perfect for growing anything hydroponically.
They don’t come with heating, but unless you live in an incredibly cold environment, the lighting will provide all the heat your plants need to stay warm enough.
You can choose between a new container and a used container, and both options are valid. Selecting a used container saves a few thousand dollars but runs the risk of damage and broken parts, resulting in leaks and longevity issues. I would only recommend using a used container if you can inspect it in person first to verify that it doesn’t have any holes or rust.
Container costs with delivery are going to vary widely depending on your location. Still, a new 40′ reefer container should cost around $12,000 after delivery, while a used container will be $3-7,000, depending on condition. You may be able to pick up a used container in good condition at a reasonable price sometime in the next year or two as a result of containers manufactured to transport the Covid-19 vaccine.
2. Irrigation And Growing Method
Choosing the irrigation method, you will use will determine the rest of the build. Assuming you are shooting for a hydroponic farm with either NFT or towers to maximize space, this step will affect lighting and all other features.
This is an area where you can choose a prefabricated system and parts or go truly DIY and make a setup from PVC. I’ll link two established companies to choose from to go that route, saving you time and hassle. If you are looking for a good project, then building your own is a great way to go.
Growers Supply and ZipGrow both offer supplies that are easy to put together for hydroponic systems. For completely DIY systems YouTube has a plethora of information on ideas for systems and automation ideas.
Initial costs can be kept low by choosing a simple growing method using hand-watering. In my experience, microgreens are a great candidate for this and are highly requested by many chefs. Mushrooms are another low-tech option and can fetch high prices in the right market.

3. Lighting
Lighting will likely be your most expensive component in building an indoor farm. Skimping in this category will result in poor growth, high electricity costs, and faster depreciation due to low-quality parts. Choosing the right lights will help in both the short and long term.
The Dimlux Xtreme series lights are a fantastic LED option with high output and plenty of adjustability to dial them into your lighting needs. Each morning will cover a 5×5 sq ft growing area, and the number needed will depend on your growing method; somewhere between 6 and 24 will likely be required, accounting for a large portion of the budget.
Light requirements for leafy greens like lettuce, kale, and spinach are relatively low. You can get away with six lights in a minimalist setup and 18 for vertical farming methods that offer maximum growing area. Light-demanding plants such as cannabis, tomatoes, and peppers will need at least 12 lights to achieve efficient growth rates, and 24 if you plan on doing two vertical layers.
For more budget-conscious growers who are growing less light-dependent plants and are okay with a slightly longer time between harvests, LED grow lights can also be used at the loss of some efficiency. This may not make a massive difference for lettuce, but with cannabis, you’ll lose a significant yield.
4. Controls
To match the Dimlux lights, going with a Dimlux Maxi Controller means you are getting the most from all the available features, including a soft start (huge electrical savings) and easy-to-use lighting options, including seven dimming modes and a sunrise/sunset simulator.
The most essential features for this controller are that it needs to control the lighting automatically, track the data, and the ability to control a ventilation fan. Temperature, light, C02, and VPD sensors are also available, helping track the data affecting your plant’s growth.

5. Ventilation And Dehumidification
Ventilation is the final big choice in setting up your farm unit and is incredibly important to introduce airflow and pull our humidity. Choosing an extractor fan rated 3,000-6,000 CFM will be perfect for clearing out the stale and humid air and replacing it with fresh air.
While not strictly necessary to install ventilation, you run a high risk of mold and mildew building up, and the stale air causing problems with plant growth. If you live in a particularly humid area, you may need some extra help with dehumidification.
A great option for a dehumidifier for this application would be the Quest Dual 225. This dehumidifier is energy efficient and capable of removing 225 pints/day and is a high-quality product assembled in Madison, Wisconsin.
Using a dehumidifier provides the additional benefit of air filtration, which can remove dust and mold and keep the growing space cleaner. Using a dehumidifier will add $3,300 or so to your initial costs, but the long-term productivity will outweigh those initial costs.
6. Layout
When figuring out the layout of the container farm, there are a few easy mistakes to watch out for. You’ll need to find the right balance between working and farming space while leaving large enough walkways to make working there a breeze. Using CAD software is an excellent way to layout the system, or the old-fashioned method of paper and pencil works too.
I have used the free version Google SketchUp to design projects ranging from individual systems to multi-acre greenhouses, but it does take some getting used to. Creating a 3D model helps to visualize the use of space and easily rearrange materials, and can aid in getting approved for a loan.
Preexisting plans for container farms are hard to find, but with some deep browsing, you can get ideas from simple to more complex layouts and design your own from there.
Building vertical layers mean that you’ll need appropriate lighting for each layer, and they should be narrow enough that you can reach across easily. Building the layers from wood, metal, or PVC supports are all possible options, with metal being the most long-term and easy to clean but expensive.
Lumber is the cheapest option but can have problems if it is constantly wet, including mold, structural issues, and a good place for diseases to hide. To prevent these issues, ensure you frequently check for leaks in the system and use an appropriate cleaning product to stop mold and disease.
Some builders use moving designs to maximize space and create a walkway between isles only when needed. For experienced builders, this can work, but for a novice DIY builder, this adds additional points of failure if the mechanisms get stuck or break. You’ll have to decide what ease of use vs. efficient use of space is suitable for your setup.
7. How Much Does It Cost To Build A Shipping Container Farm
Building a shipping container farm will cost between $15,000 and $75,000, depending on what you have on hand, how much work you want to put in, and what setup you are going for. At the end of this article is an in-depth spreadsheet on the costs that go into this project, giving you a better idea for planning your container farm.
Both of these spreadsheets can be used as guides to edit your exact costs, produce prices, and if you have a different idea for a setup. Feel free to copy them and use them as a base for your urban farm project.
Plan on spending about $50,000 on your container farm, depending on the prices of local supplies and how much work you are willing to put into making your parts. These systems are two basic options that allow for high production in a small space, producing over $90,000 in revenue per year (revenue estimates below).
Here is a simplified version of the spreadsheets so you can see where the high costs in the production process are.
| Category | Cost |
|---|---|
| 40′ Reefer Shipping Container HC- New | ~$12,000 |
| Irrigation And Growing Method | ~$7500 |
| Lighting | ~$23,000 |
| Electronics | ~$1,800 |
| Other Costs | ~$6,000 |
| Total Cost | ~$50,300 |
As you can see, lighting is in the most expensive category, accounting for nearly half the total cost. This is because quality lighting is the difference between a good harvest and a bad one for indoor growing. Spending more on lighting upfront will result in greater yields and energy savings over the long term and will increase profitability over time.
Estimated Monthly Operating Costs
Your two highest monthly costs are going to be electricity and labor. Doing the work yourself means that more profit goes into your pocket. If you can get electricity at commercial rates rather than residential, you can also cut electrical costs down significantly.
Financing the project yourself can be difficult, but you will save over $900 monthly, meaning more money in your pocket. This is based on a five-year loan at a 10% interest rate for $43,000, assuming you finance the other ~$7,000.
Rent is the other cost that will range based on your location. Partnering with a restaurant that allows you to use their space at a reduced rate or placing the farm in your backyard can reduce rent. On the other hand in highly populated cities and contested areas, finding a space may be more expensive.
Other costs include seeds, packaging, transportation, nutrients, cleaning supplies, and if you have rent to pay. These costs will be about 25% of the total, with rent and electricity being the other 75%. Packaging is another area where you can save money by using reusable options and not needing to buy new plastic monthly. Still, your ability to do so depends on local markets.
| Estimated Monthly Operating Costs | Quantity Needed | Price Per Unit | Total |
| Variable Costs | |||
| Electricity (kWh) | 6,000.00 | $0.15 | $900.00 |
| Labor Hours (30 hours/week) | 130 | $17.50 | $2,275.00 |
| Nutrients, Total Mixed Gallons | 150 | $2.50 | $375.00 |
| Seeds | 2600 | $0.0117 | $30.30 |
| Packaging | 2528 | $0.21 | $530.88 |
| Fixed Costs | |||
| Rent (Based On sq. Ft.) | 320 | 1.15 | $368.00 |
| Cleaning Supplies | – | – | $50.00 |
| Miscellaneous Costs (repairs, fuel, etc.) | – | – | $300.00 |
| Loan Repayment (5 yr, 10% interest) | – | – | $913.62 |
| Total Estimated Costs | $5,742.80 |
Estimated Revenue
Estimating revenue is straightforward by using the number of planting spaces available divided by the number of cycles or products you can get out of one month. This does not include the time the seeds spend in the seedling cart, so you’ll need to know how long it takes from plant to transplant to harvest and some planning to ensure that you do not have any downtime between harvest and transplant.
Your best options will be high-value crops or fast-growing/high turnover options. Lettuce is an excellent choice for this. A high turnover crop is a good idea for new growers and those who need cash flow as soon as possible since longer growing plants will mean no income for 3-6 months. You’ll have to make these decisions based on your situation.
For a simple system with one output, revenue might look as follows:
| Monthly Revenue Estimates | |
| Planting Spaces Available | 1800 Spaces |
| Days From Transplant To Harvest | 21 |
| Harvested Plants Per Month (Planting Spaces/(Days To Harvest/30.4)) | 2,608 Plants |
| Revenue Per Plant | $3.00 |
| 2% Crop Loss | -$156.50 |
| Estimated Monthly Revenue | $7,667.50 |
Net Profit
From the example above, the monthly net profit would be $7,667.52 (revenue) minus $5,742.80 (costs), giving you a profit of $1,924.72, or $4,199.72 if you include paying yourself labor costs. This becomes a respectable $50,396.64 yearly before taxes from a 30-hour work week.
After paying off the loan, each unit should profit about $2,838.34, or $5,113.34, including labor. This means that profits, including labor, will result in a $61,360 salary for the hard-working owner-operator.
Two full-time employees can run three container farms without working more than 40 hours on average, depending on the efficiency of the workers and the crops being grown. One individual can likely manage two systems themself, but be prepared for the occasional 50+ hour work week to keep up with all the necessary work.
These numbers are, of course an estimate, and your actual numbers may vary. By finding a good niche market and developing a solid growth strategy you are likely to make more, and as long as you have customers for your produce, you should always be able to break even.
Some of the costs not included earlier, such as your labor hours in the construction phase, are so dependent that you’ll need to decide on your own. However, assuming you invest all your money into this, your yearly ROI will be about 68% and a 646% return in five years. you can DIY a profitable container farm with some hard work and dedication.

DIY vs. Premade Shipping Container Farms
With all the numbers out of the way, you’re probably wondering what the differences are between premade container farms and building one yourself. After all, this is a significant investment of time and money, and you’ll want to ensure it pays off. For comparison, I’ll use a similar farm: The Freight Farms Greenery S, one of the leaders of prefab freight farms.
For the similarities, both are vertical hydroponic farms capable of growing fresh produce year-round. Monthly costs will be similar, including labor, electricity, and nutrients. Depending on setups and the crop grown, both options can produce 2+ tons of food each year, although the Freight Farm option will produce more overall.
The difference between the two is that the Greenery S comes with proprietary intelligent technology and cloud access while building one yourself does not come with these technologies. The Greenery S has also gone through a lot of R&D, and the design has been nearly perfected over time while creating a system yourself leaves room for failure and inefficiencies. Premade options will also come with warranties and manuals, lowering the overall risk and taking the guesswork out of growing.
However, comparing costs to one another, building one yourself will cost somewhere in the $50,000 range, while Freight Farms sells theirs for $149,000. Making one yourself may be less efficient and require a lot of work, but for the same price you can own set of 3 farms, sweat equity excluded.
Daily Operation
The daily operations of your farm will differ depending on what you are growing, but for the most part, there will be similar tasks every day. The first daily steps are checking the plants’ health, looking for any signs of nutrient deficiency or insect damage, and ensuring all of the equipment is functioning. A quick walk-through is usually good, randomly selecting a few plants to get a closer look at and ensuring that water is flowing.
If you use a drip irrigation method, they can be prone to clog, so check each one every day and unclog them if necessary. I’d also check the nutrient tank to ensure it’s at the level you expect it to be. If it is any lower, you’ll know there is a leak somewhere.
Planting, transplanting, and harvesting are best split up on separate days if you plan on harvesting weekly, or you can do each of these tasks daily if you plan on harvesting every day. Just make sure to plan a schedule where you aren’t leaving any spaces empty for longer than a day so you don’t lose efficiency.
You should always clean and disinfect growing surfaces between cycles and work areas for the best results. I highly recommend using Garn’n’Clean liquid mix disinfectant because it uses chlorine dioxide, which is environmentally friendly and much less harsh than similar chemicals. Chlorine and other commercial cleaners can also work in a pinch but are more likely to contain harsh and toxic chemicals.
Final Thoughts
Building and running a container farm is no small task; hopefully, this guide will help point you in the right direction. It is challenging to create a rigid set of rules because there are a lot of variables to consider, including experience, budget, and local markets. Building a container farm will highly depend on what is in demand in your area.
The biggest tip I can give you is to take plenty of time in the researching and planning phase of the project to be sure that you are growing the right product for the right customer. Not growing a premium product that can sell for premium prices is the most likely reason to fail because competing prices with factory farming wholesale producers is nearly impossible.
Build relationships in the community, take the time to research and know what you are doing, and don’t be afraid to put your spin on things. If you follow these tips, your chances of success are much greater.
Detailed Costs
| Cost For Building A ZipGrow/NFT System | Quantity Needed | Price Per Item | Total Price |
| Shipping Container | 1 | $12,000 | $12,000 |
| Climate Control System | 1 | $1,020.00 | $1,020.00 |
| IBC Tote- Local | 1 | $200.00 | $200.00 |
| Pumps | 4 | $20.00 | $80.00 |
| Ventilation/Dehumidifier | 1 | $450.00/$3,300 | $450.00/$3,300 |
| Lights | 18/24 | $1095.00 | $19,710.00/$26,280.00 |
| Electrician- Local | – | – | $1,250.00 |
| Plumber- Local | – | – | $750.00 |
| Water Testing | 1 | $275.00 | $275.00 |
| Stainless Steel Table | 1 | $600.00 | $600.00 |
| Harvest Equipment | 1 | $28.00 | $28.00 |
| Lumber-Local | – | – | $320.00 |
| Misc. Hardware, Plumbing, Fasteners | – | – | $750.00 |
| Water Treatment | 1 | $330.00 | $330.00 |
| Shelving | 1 | $90.00 | $90.00 |
| Planting Equipment | 1 | $835.00 | $835.00 |
| Seedling Cart | 1 | $102.00 | $102.00 |
| Growing Systems (Towers/NFT 32′ long) | 150/40 | $65.00/$127.27 | $9,750.00/$5,090.80 |
| Total | $48,540.00/$50,410.80 | ||
| Total With Dehumidifier | $51,840.00/$53,710.80 |
Your article was a great help to me and has to clarify how I can assist some local urban farm proponents
what would be the numbers for a cannabis farm? I want to start in New Mexico (completely legal) growing no more than 50 plants in a container farm doing DWC method. what would be the numbers for a 20 or 40 ft container? what would be the numbers as far as profitability?
Great article! I am exploring to grow native starter plants as part of stewardship programming for the county that I work for.